Updating The “Pie Chart” Target

The classic “pie chart” target splits a bullseye target into wedges of varying sizes, each labeled with a common shooting error. My research into the history of pistol training led me to a 1962 NRA American Rifleman article written by USAF shooter Edmund Abel titled “Pistol Targets Talk”, which was sold as a reprint and included in NRA publications. It listed errors that a right-handed bullseye shooter might make, with example targets showing where those failed shots are likely to hit. The pie chart assumes that the pistol is zeroed and correctly fired shots will hit the bullseye center.
Abel’s original list of eight common errors were as follows:
- Thumbing – pushing the thumb against the frame as the trigger finger presses the trigger
- Heeling – pushing the muzzle up with the heel of the palm as the trigger is pressed
- Breaking the Wrist – pushing the muzzle down as the trigger is pressed
- Too Much Trigger Finger – laying the 2nd and/or 3rd section of the trigger finger against the frame, which pushes the muzzle left as the trigger is pressed
- Riding the Recoil – anticipating recoil by moving the pistol upward before the round fires
- Tightening the grip – increasing grip pressure on the pistol as the trigger is pressed
- Jerking the trigger – moving the muzzle low-left as the trigger is pressed, and
- Inconsistency – making different errors with each shot.
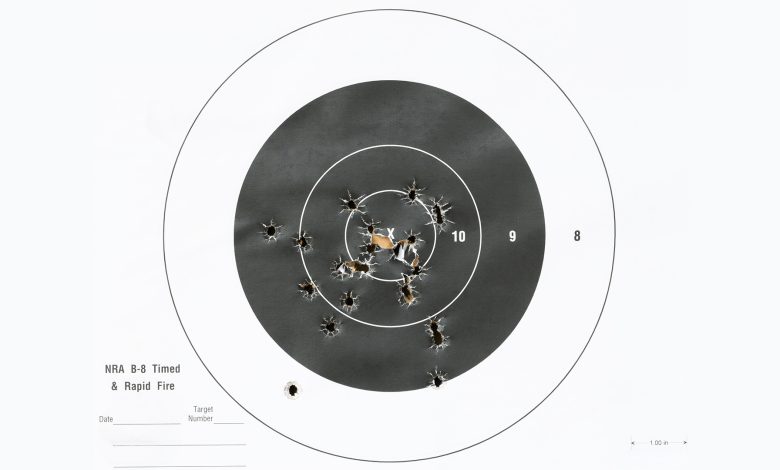
The cover image for this article is a target shot by a recent student. As a pistol instructor for more than 30 years, my observations are that struggling shooters often make multiple technique errors. Telling them “Don’t do (item from Abel’s list),” is unlikely to correct the problem. Shooters that need correction are rarely consistent enough to place all their bad shots in a neat pie-slide sized area on the target for easy diagnosis. A more useful pie chart should recommend solutions for right handed shooters using a modern two handed grip.
Half of Abel’s original list (1, 4, 6, and 7) can be combined into the category: Other Fingers Moving. Nine fingers stay still, and only the trigger finger presses the trigger. Grip pressure shouldn’t change once the sights are on target. Many shooters do not grip the pistol hard enough with the fingers of the support hand. Worse, they are likely to push down with the firing hand thumb and/or tighten their grip with all their firing hand fingers as they work the trigger, because they aren’t gripping the gun hard enough with the firing hand either.
Another problem is that the shooter spends too long waiting for a perfectly still gun, then pounces on the trigger. So using the phrase “sight movie” instead of “sight picture” gives the shooter permission for the sights to move as they concentrate on smooth trigger movement. Trigger finger movement should be like putting in a contact lens, not gouging out an eye.
Three more (2, 3 and 5) are a single category: Arms Moving. This means that the shooter is pushing or pulling on the gun before the shot breaks.
Trigger Control For Dummies
One cure for any of these errors is a live/dummy or live/empty two shot exercise. Many find it works better than pure dry fire or random dummy rounds to expose the shooting errors that need correction.
Load with a live round in the chamber and a dummy round as the next round in the semiauto’s magazine or chamber in the revolver’s cylinder. The first shot will go bang, second shot will go “click”. The second shot will reveal the unwanted gun movement that likely occurs on live fire shots. Repeat that drill until the shooter is consistently able to keep the gun still for both the live and dummy shots.
Another variant of this drill, which can be done without having to purchase, load, eject and recover ejected dummy rounds, is live/empty. Load the gun normally, using a magazine. Then eject the magazine and fire the 2 shots. Unless your gun has a magazine safety, this will give you one live shot and one dry shot. To repeat the drill, insert the magazine and load the chamber normally. Do not lock the action open, drop a live round in the chamber and close the slide, as this is hard on your extractor. If your gun has a magazine safety or is a subcompact with a frame too short to grip with all 4 fingers of the firing hand without a magazine inserted, the live-dummy version, performed using a pinky-shelf magazine that allows for a full firing grip, is best.
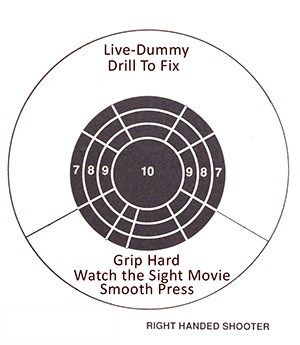
 Our solutions-based updated pie chart looks like this:
Unlike the classic pie chart, the updated version gives simple advice for correction, if the shooter is willing to invest in a few dummy rounds. The drill can be shot slow or fast, on close or far targets – whatever skill you are trying to master. Try the updated chart and the live-dummy (or live-empty) drill on your next range trip or use them to help a buddy shoot better.
Read the full article here


