Purifying Water Without Metal – Survivopedia

Let’s imagine a scenario where you’re out in the wild. You find yourself in the deep woods of the Appalachian Mountains or perhaps on a remote stretch of plains where pioneers once tread. Luckily, you’ve managed to get a fire going, gathered a handful of river stones, and there’s a desperate need for water. There is no metal pot and no fancy survival gear. Just you, fire, water, and rocks.
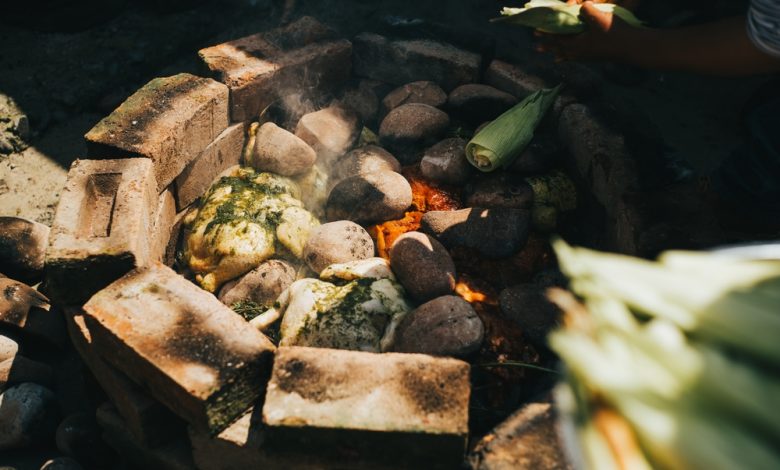
Sounds kind of rough, right? But here’s the thing: this isn’t new, and humans have been figuring this out for thousands of years. Native Americans, the first European settlers, and early pioneers all relied on what now survivalists call “the boiling rock method” for purifying water. As the name implies, this method involves heating rocks in a fire and dropping them into water to purify it. Simple, low-tech, and most importantly, life-saving.

So, why don’t we hear about it much today, and only a handful of survival writers mention it? Probably because it’s messy, slow, and a little nerve-wracking if you’re not careful. However, in a survival situation, this method becomes your salvation. Let me break down exactly how it works, why it works, and how to do it safely in the field.
Ancient Wisdom from the Native Americans and the Pioneers
Long before stainless steel and aluminum pots found their way into every home, water purification wasn’t optional. Native Americans had mastered the boiling rock method centuries ago. They would dig pits, line them with bark, clay, or wooden containers, and carefully drop in red-hot stones. The stones would transfer their heat to the water, bringing it to a boil without burning or melting the container.
When European settlers arrived, they quickly adopted the same technique. Iron and copper were expensive, hard to transport, and slow to heat over a campfire. Rocks were free, plentiful, and reliable if you knew which ones to use. The method persisted because it worked, over and over, without gear or any other costing resources needed. And here’s the kicker: even today, if you find yourself off-grid with no metal containers, the same approach works just as well.
It’s amazing to think about, and there’s a certain pride when you’re literally using the same survival hack your ancestors did hundreds of years ago. I can honestly tell you there’s something satisfying about making things work, the old way.
>>Survival skills like these were not just tricks, they were lifelines. Discover other forgotten frontier methods that helped entire communities endure without modern tools.
How the Boiling Rock Method Works
At first glance, dropping a rock in water sounds primitive, but if you think about the whole process, it’s just physics at its finest. When a stone is heated in a fire, it stores energy. Once dropped into water, that energy transfers almost instantly, raising the water’s temperature. Keep cycling hot stones into the water, and eventually, it reaches a boil. That’s enough to kill most pathogens, making it drinkable when you find yourself in a survival situation.
Here’s a small warning: this method is slower than modern stoves and metal pots, and you’ll need patience, besides a good stockpile of stones ready. However, if speed isn’t your enemy, this method is reliable, and it doesn’t demand anything beyond the resources you find in nature.
Choosing the Right Stones
Not all rocks are created equal, and some can explode when heated because water trapped inside pockets turns to steam and builds pressure until the rock shatters. Nobody wants flying rock shards in their face when their survival is at stake.
So, which rocks should you pick? First, go with granite and basalt since these rocks are your best friends. They’re dense, durable, and heat well without cracking. If you can’t find any, sandstone works too, though it’s a bit softer.
Avoid river rocks that have been submerged for years, since these might have trapped water inside. Also, steer clear of volcanic pumice, limestone, or any rock that’s flaky or porous since they trap a lot of water.
Size matters, so you want stones big enough to hold heat but small enough to drop into your container safely. About fist-sized, I would say, is ideal, but this also depends on the size of your container. If the rocks are too large, they’ll crack your primitive container, and if the rocks are too small, they cool too fast.
>>Physics might make it work, but preparation makes it practical. See how preppers today are stretching their resources far beyond what most think possible.
Choosing the Right Container
Since we already established that you don’t have metal pots, your container has to be natural. For example, the Native Americans often used hollowed-out wooden bowls or bark-lined pits. Clay vessels work brilliantly too, though they need to be cured or dried slowly to avoid cracking.
Here’s a survival tip: always check for weak spots before dropping hot rocks in your container. Even a small crack can explode when heat hits, spilling water and ruining your hard work. And remember, wood or bark will scorch if it touches flames directly, so keep your container above the coals, not in them.
>>Containers may crack, burn, or fail, but ingenuity always fills the gap. Learn the resourceful tricks pioneers used when gear was scarce and survival was on the line.
Step-by-Step Setup
Now let’s get into the details and see how an experienced prepper would do it:
1. Start by building a strong fire. You want a pile of coals or a solid blaze that can heat your stones to red-hot. Not white-hot since too much heat can shatter rocks instantly.
2. Select your stones. Pick fist-sized granite or basalt, free of cracks and moisture. Dry them near the edge of your fire first, then gradually move them closer until they glow red.
3. Prepare your container. Fill your wooden or bark bowl, or clay pot, with water. Place it on a flat, stable surface, slightly away from the fire.
4. Transfer rocks carefully. Use sticks or tongs to drop stones into the water. The water may hiss and steam, so stand back. Keep a safe distance to avoid getting burned.
5. Cycle stones. Remove rocks that are cooling and replace them with freshly heated ones. Repeat until water reaches a rolling boil. From experience, I can tell you that this process takes 15–30 minutes, depending on volume and stone size.
6. Check your water. Let it cool slightly, then inspect for any debris. If you have access to other natural resources, you can improvise a primitive filtration by passing the water through sand, gravel, or charcoal to improve clarity.
Practical Safety Considerations
This isn’t a method for the reckless, and you must be careful since you’re dealing with red-hot stones and boiling water. A few precautions go a long way:
- Use sticks or heat-resistant gloves to handle rocks. Don’t pick them up with your bare hands.
- Avoid leaning over the container when placing rocks since the steam can burn badly.
- Inspect stones constantly. If you notice cracks, toss them because they’ll explode when heated.
- Check water quality. Even after boiling, watch for discoloration or sediment that indicates contamination.
You might feel thirsty and impatient, but rushing is a recipe for injury. In survival, a careful prepper lives longer.
Advantages and Limitations
Some of you may be wondering why bother with this slow, messy method when you have metal pots at home? Here are a few reasons why:
If you lose your gear and are off-grid, there will be no metal required to boil the water.
It is a reliable and time-tested method that works in remote environments without the help of modern tools.
The method can be scaled by heating multiple containers and rotating stones to obtain a larger quantity of water for other needs as well, like cooking or bathing (hot/warm water mixed with saponin plants is a luxury in survival scenarios).
And, since I’m a straight shooter, I feel obliged to also mention the limitation of this method. Here’s what to keep in mind:
This is a slow process that takes time. You will spend a lot of time if you need to purify a large volume of water.
This method is fuel-intensive, and you’ll burn more wood than with a metal container.
It’s also a messy process, and the hot rocks and scorched containers require careful handling.
However, even with downsides, it’s a survival skill that can save your life. In a crisis, knowing how to purify water without metal is invaluable.
>>Water is life, but only if you can secure it. See how preppers today are tapping into overlooked sources to stay supplied when the taps run dry.
Extra Survival Tips and Variations
I’ve tried this method a dozen times in the field, and here are the tricks that every experienced prepper should know to maximize efficiency:
- Batch heating: Preheat multiple rocks before dropping them in, keeping water consistently hot.
- Primitive filtration: Layer sand, gravel, and charcoal to filter water after boiling. Not mandatory, but it improves taste and safety.
- DIY containers: If you can, shape clay or bark into vessels large enough for water. Fire-cured clay is surprisingly durable, and you will save time by not manufacturing containers every time you need drinking water.
Also, here’s something you might not think about: the size and shape of your fire matter. A compact, consistent heat source is far more effective than a sprawling blaze. And yes, rotating stones between multiple fires is a legit technique used by Native Americans to keep a steady supply of hot stones.

A final word
Look, I know that this process is not glamorous. You’ll get dirt on your hands, smoke in your eyes, and maybe a few scrapes from stubborn rocks, but it works, and that’s the point. It’s a direct, tangible connection to ancient survival wisdom, and it’s brutally effective when modern conveniences are missing.
You don’t need a metal pot, you don’t need a fancy stove, and you certainly don’t need Wi-Fi to make this method work. Some experts will tell you that all you need is three ingredients to make it work: fire, water, and a handful of rocks, but I will add a fourth: the patience to do it right.
So next time you’re in the wild enjoying your camping trip, think like a pioneer, think like a Native American, and put this method to the test.
Read the full article here


